Back in the Red

Hang in there Red Dwarf fans, only a couple more months before Series 11 airs! In the meantime, feast your eyes on this totally spot-on Red Dwarf custom LEGO play set designed by Bob Turner. The dance-ready Series 8 version of Blue Midget shuttlecraft is definitely the star of the show here, but it’s the smaller details that really make this scene a real fan-pleaser:

Of note are the brick-built scutter, the inclusion of the Holly Hop Drive from Series 2, and most importantly a set of custom Red Dwarf minifigs. Each one is accurate and immediately recognizable. And in addition to the main crew, Bob has even included minifig versions of popular alternate characters Duane Dibbley and Ace Rimmer.

Smoke me a kipper, I’ll be back for breakfast!

How-to: Tools of minifig customization – Confessions of a customizer (Part II)

In our first guest post from Jasbrick, we learned about how to get started with minifig customization. Now, let’s hear what he has to say about the tools of the trade.

Now that you have a concept and have gone as far as you can by conventional means it is time to bring in the tools. The range of customisation techniques mean that even with limited tools you can get some pretty impressive results without breaking the bank.

Painting and re-colouring

RAF 100th Steamsuit SquadronI use painting to add details or re-colour parts that would not otherwise be possible.

For example the following minifig fits the steampunk genre with its almost rust / bronze coloured metallic effect which would have been impossible with the original bright white Buzz Lightyear original scheme.

Those of you who have everything you need but with parts that are not quite in the colour you want have two options: Dyeing or Painting.

Dyeing using vinyl dyes works well with parts that you want to change completely, but is limited in colours available and achieving a particular tone can be tricky.

Painting can offer more flexibility in colour choice and coverage, however the biggest downside is that painting plastic is difficult. I see examples every day of great custom concepts that are ruined by the quality of the painting. As painting is a favourite technique of mine I will go into much more detail on this and how to avoid creating a dull, streaked and unconvincing paintjob.

The key tools you need for painting are shown in the image below:

Painting Equipment

  1. Spray undercoat (essential for smooth painting on a plastic surface);
  2. Games Workshop Foundation paints (high opacity paints that give a good coverage with a single coat;
  3. Games Workshop Normal paints (good range and availability);
  4. Privateer Press P3 paints (slightly better quality than GW paint in my opinion, smaller range of colours and poor availability);
  5. Vallejo Paint (Excellent range of paints that also has colour range that is named after military colour schemes e.g. Lluftwaffe Blue);
  6. My device for holding helmets / heads for painting;
  7. Games Workshop brushes of various sizes.

The most crucial of all is the spray primer, as painting a smooth coat onto plastic is virtually impossible without it. Spray primer covers the part with a very thin layer of paint which is much more likely to bond with the plastic and not scratch off easily. Subsequent coats of paint adhere to this base and settle without streaks or chipping. So if you want a minifig helmet to be a nice shade of dark blue to match your plan for a Judge Dredd figure then you need to spray it before applying the perfect paint colour.

Your choice of paints is also important and I suggest you experiment with different types before applying to a Lego part. Characteristics like price, coverage, mixing, drying time, finish and colour choice all need to be considered. I personally use the Games Workshop model paint range as they score highly on all of the above criteria (except price). Games Workshop also have a great range of inks for washing and foundation paints for good coverage. Other good ranges are Vallejo and Privateer Press P3. All of these sell starter sets which contain a good selection of paints and brushes to get you started.

With paint brushes it is not just about size but how you use them that counts… You will need to have good quality model brushes in three main sizes: fine detail, standard and basecoat. Working out the right brush for the job is essential as a small brush will not cover a large area as smoothly as a basecoat brush. As with most things brush control improves with practice and it is advisable to test your new skills on something less precious than your rare minifig part. The following is an example of fine brush work:

Luchador: British Bulldog

This wrestler’s mask was painted freehand with a fine detail brush in multiple layers.
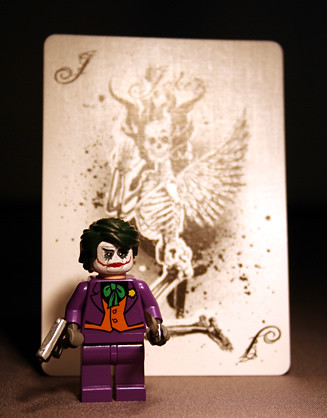
Jasbrick Joker V2

The joker here has face details that were painted on freehand and the hair which was primed and then painted with a dark green colour using a basecoat brush.

Painting detailed designs requires not only brush control but paint control as well. Another obvious problem in some custom work is the thickness of paint application and poor layering. Experience in handling paint can be shortcut by the use of a tool known as a Wet Palette. These are so easy to put together and it is definitely going to improve your paintwork. Quite simply all you need is a small tray, about the size of an 8 x 16 brick, and some absorbent cloth or paper towel. Put the cloth in the tray and then add water to it until the cloth is completely damp… That is it, now all you need to do is transfer your paint to the wet palette before painting on the part. The damp cloth waters down the paint slightly, keeps the paint from drying and also allows you to mix with more control.

There are a whole host of tutorials on the internet for how to create a wet palette and how to paint, however I hope to bring more Lego-specific tutorials to you in the near future.

An important part of painting is the final finish. Paint applied properly will be more resilient than you think possible. However, to seal the deal you can use a varnish to protect your work. Varnishes can be matt or gloss, with the latter being particularly useful for returning a shine comparable to pure unadulterated plastic.

How-to: Confessions of a minifig customiser – Part I: Getting started

As we say in our AFOL jargon glossary, purism is “a form of religious fundamentalism.” LEGO fandom includes a broad range of preferences for what’s “legal” and what’s not. In the spirit of broadening our horizons, we’re very pleased to bring you the first in a series of posts about LEGO minifig customization by master customizer Jasbrick.

Light Tent TestContrary to popular belief customisation of minifigs is not a dark art and even established purists have tried their hand at slapping some paint around (albeit on the Friends Mini-dolls). Some will never stoop to the mutilation of their favourite brand of ABS plastic, however I do believe that if done properly it can at least be appreciated by all.

The Brothers Brick have given me the opportunity to introduce you to some of the tools and techniques of my trade to help those amongst you that have the desire to walk on the dark side for a while. In later posts I will go into specific techniques that I developed in my time as a customiser. Hopefully you can benefit from avoiding the pitfalls I fell into and get a few projects like these underway:

New Gears of War 3

These minifigs involve more advanced painting techniques and some third party accessories.

Monster Manual Player Power

This group utilises painting, combinations, third-party accessories and printed decals.

Establishing a strong concept design

One tool a customiser must have is a highly developed imagination (something pretty common in the Lego community); everything else is optional.

Off to Afghanistan!Those moments when putting a particular combination of parts together and a perfect fig pops out are wonderful, but about as rare as chicken dentures. The key to a good custom project is pre-planning and a well defined concept. This does not have to be something completely new, as for example computer game concept art offers a rich seam of material to be interpreted, or real life inspiration can be just as good. The minifig on the right was created for a Green Beret Major currently serving in Afghanistan who sent me a photograph of himself to copy.

But if you want to start from scratch then a sketchpad is your best friend. You don’t even need to be good at drawing to develop a decent concept due to the simplicity of the design of our little friend the minifig. As this series develops I hope to be able to share with you some of the concept designs that I have developed and how they become a reality. Alternatively you can sketch your concept over a template like this:

Collectable Minifig Design Interview

Once the concept is set (not in stone, but pretty solid) the next step for me is to determine how much of this can be achieved with standard parts or by utilising third party accessories. I will be delving deeper into how to get the best from suppliers such as BrickArms, BrickForge, Brick Warriors and Arealight later, but I highly recommend checking out these companies as they offer a great range of products that can serve as inspiration in themselves.

Parts Library

As an AFOL who has amassed quite a large collection of minifig parts and accessories I have a library that I can dip into that can make most custom projects a matter of tweaking to get the final effect rather than building everything from scratch.

The following image is a recent group of minifigs that I put together that are without any noticeable customisation. I managed to achieve a lot with just the combination of parts and a few third party accessories thrown in to tie the concept together:

Odysseus Crew need ship

I recommend that you take a close look at the Minifig and Minifig parts areas in the catalog on Bricklink and see which figs / parts speak to you of further opportunities. Developing an inventory of useful parts is essential to allowing you to get projects moving swiftly before your enthusiasm for the concept dies.

Sorry Son, Daddy Needs Your Bricks

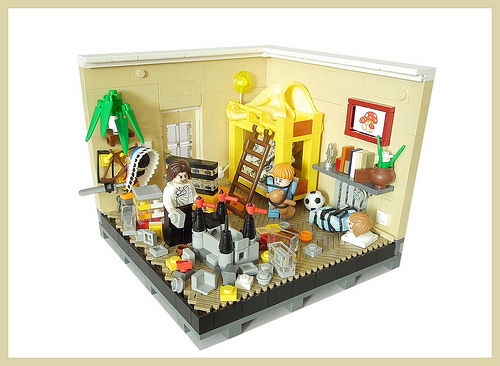
I wonder if this diorama by Karwick stirs up memories for any of our readers. It depicts an AFOL father who’s decided to take over his children’s Lego collection, and start building. I’ll take the tied up children as a bit of poetic license.

The story aside, this diorama is packed full of well-built details. A few of note are the radiator under the shelf on the right side, the wall light above the bed, with cord leading to an outlet, and the clever floor.

Afol (I)

How to identify LEGO Series 5 Collectible Minifigs by touch

iconLEGO Series 5 Collectible Minifigures proves, it’s pretty hard to identify the minifigs using any but the “touch and feel” method. Thankfully, SEALUG / TexLUG member Jason Junker has put together this handy guide to find the minifigs you want by touch.
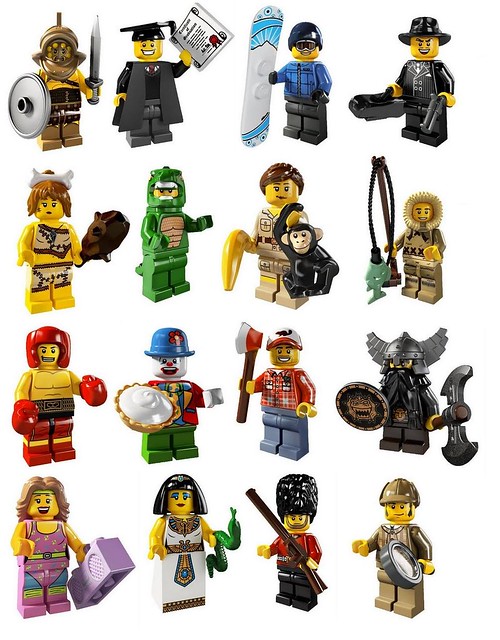
Small Clown: His bowler hat feels similar to the Detective’s hat. He also has a pie, which feels smaller than I thought it would. (that’s what she said) [Tee hee! -ed] Each time I confirmed by feeling for the short legs.

Boxer: The surprise here is that his boxing gloves are attached to his hands. He’s one of the hardest to feel if you don’t know this little fact. Also feel for the gap in his face guard. (Thanks for the “attached gloves tip” W. Heron)

Royal Guard: 2 words, HUGE hat. And feel for the rifle to confirm.

Lumberjack: The only “baseball cap” in this series. The axe is easily recognizable. But be sure that you feel the attached axe head on the end, or it could be the Evil Dwarf’s axe handle.

Zookeeper: I expected the monkey to be easy to feel, but the banana is the dead give away here. No other pieces feel anything like it.

Graduate: He’s the only fig with a 2×2 tile (certificate, like “Disco Guy’s” record from S2), and his graduation cap is what I used to confirm. It’s square, with 1 different feeling corner for the tassel and a little raised bump in the middle of the top.

Cave Woman: The only fig with a squishy element this time. Her hair. Feel for the bone separately, and the club is the same as the S1 Cave Man’s. (Thanks for the “squishy hair tip” W. Heron)

Snowboarder Guy: Just like the last 2 snowboarders, the snowboard is a dead giveaway.

Detective: His hat is double billed, so feel for both sides, or it could be the Small Clown. I felt for the magnifying glass to confirm.

Egyptian Queen: Huge wedge dress, and snake are easy to feel.

Ice Fisherman: The fish, and fishing pole are the giveaway here, just like the last 2 series fisherman/gnome.

Evil Dwarf: The winged helmet is bulky, but so are the pieces for the Royal Guard & Gladiator, so I felt around for 1 of the 2 detached axe blades, or the handle. The difference in the shield between the Gladiator’s is that the front of the Evil Dwarf’s is smooth.

Gladiator: He has a huge bulky helmet, but he’s also the only fig with a knife/sword. It’s shorter than I expected. (That’s what… never mind) The difference in the shield between the Evil Dwarf’s is that the front of the Gladiator’s has a stud.

Gangster: This fig has the smallest accessory, his pistol. I also felt his hat, it’s he same as the Cowboy’s from S1 or Indiana Jones’. I never once knowingly felt his case.

Fitness Instructor: Big long hair, and the “boom box” feels like a brick with a handle (just like the Rapper’s from S3)

Lizard Guy: Last but not least, the one I was most excited about, and will be the first one I open… His tail was what I ended up feeling for. It’s a very large piece that fits under his head like a backpack, so you can feel for that tab with the hole in it as well.

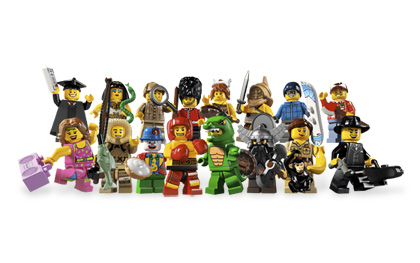
Jason rightly says that it’s helpful to have a good picture in front of you, so here it is:

LEGO Series 5 Collectible Minifigures

Custom commando minifig by The-Bricker

Minifig customizer The-Bricker combines chopped-up bits of BrickArms, judicious use of paint, and a lot of glue for a really great commando fig.

Custom LEGO minifig Marine

Custom minifigs frequently don’t stand up to closer examination (and often look best in person), but don’t miss the photo’s large size for all the details.

Collectible Minifigures Series 5 – first high-res photos

Though low-res and group shots of Series 5 Collectible Minifigs have been circulating for a little while, I think this is the first set of “solo” shots at a high enough resolution to make out details and therefore be worth discussion.

Series 5 single shots

Photo hosted by Unknown User2596 (provenance unknown).

We don’t know what the official names are yet, of course, but here’s a list of the sixteen minifigs that the series contains:

  • Gladiator (Mirmillo, specifically)
  • Graduate (no Mrs. Robinson
  • Snowboarder
  • Gangster
  • Cave Woman (hair not long enough to be dragged by — how progressive!)
  • Lizard Man (continuing furry fandom in LEGO form)
  • Zookeeper (with monkey)
  • Inuit/Eskimo/Yupik/Inupiat Fisherman (let’s see how LEGO untangles that political minefield with the official name…)
  • Boxer (a poor boy, his story seldom told)
  • Clown
  • Redneck Canadian Lumberjack (proposed name updated)
  • Dwarf
  • 80′s Aerobics Girl
  • Cleopatra (with asp)
  • Coldstream Guard (ahhh, just missed the royal wedding)
  • Sherlock Holmes